User Manual
Setup and Usage
This chapter provides details about how to set-up and use the various modules of this extension and will present several examples and scenarios to demonstrate the functionalities. A basic understanding of how to work with Microsoft Dynamics 365 Business Central is presumed.
Orig. Unit Price, Orig. Unit Cost and Orig. Line Discount %
Two fields are added to the Sales Line table and Purchase Line table, i.e. “Orig. Unit Price” (Sales Line), “Orig. Unit Cost”(Purchase Line) and “Orig. Line Discount %” (both Sales- and Purchase Line). These fields will contain the original “Unit Price Excl. VAT” (Sales), “Direct Unit Cost Excl. VAT” (Purchase) and “Line Discount %”, which were suggested by Microsoft Dynamics 365 Business Central based on the best price principle, when the line was entered. When a user decides to overrule the “Unit Price Excl. VAT” (Sales), “Direct Unit Cost Excl. VAT” (Purchase) or “Line Discount %” these fields will not be changed.
The fields “Orig. Unit Price” and “Orig. Line Discount %” are also added to all other tables associated to the sales and purchase process, i.e., “Sales Quote Line”, “Sales Order Archive line”, “Posted Sales Shipment Line”, “Posted Sales Invoice Line”, “Purchase Quote Line”, “Purchase Order Archive line”, “Posted Purchase Receipt Line” and “Posted Purchase Invoice Line” as well as in the return order process tables and pages.
Manual Price
This module is built on the previous module. An additional field called “Manual Price”, is added to the Sales Line and Purchase Line. When a user decides to change the “Unit Price Excl. VAT” (Sales Order line), “Direct Unit Cost Excl. VAT” (Purchase Order Line) or “Line Discount %” manually, this Boolean field will change its value to True in de order line as soon as the focus is changed to another line. This is triggered by the fact that either the “Unit Price Excl. VAT” or the “Line Discount %” deviates from the “Orig. Unit Price” resp. “Orig. Line Discount %”.
In the example below the first Sales Order Line the “Unit Price Excl. VAT” was changed manually and in the third line the “Line Discount %” was added manually.
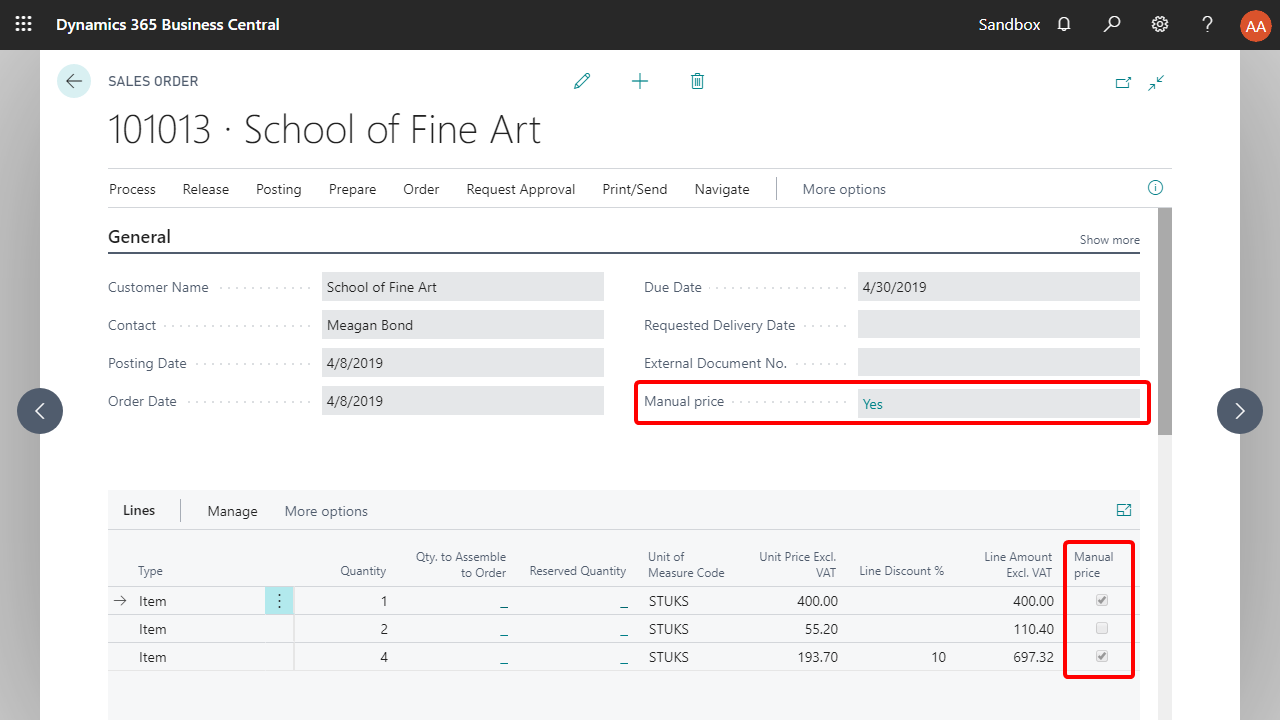
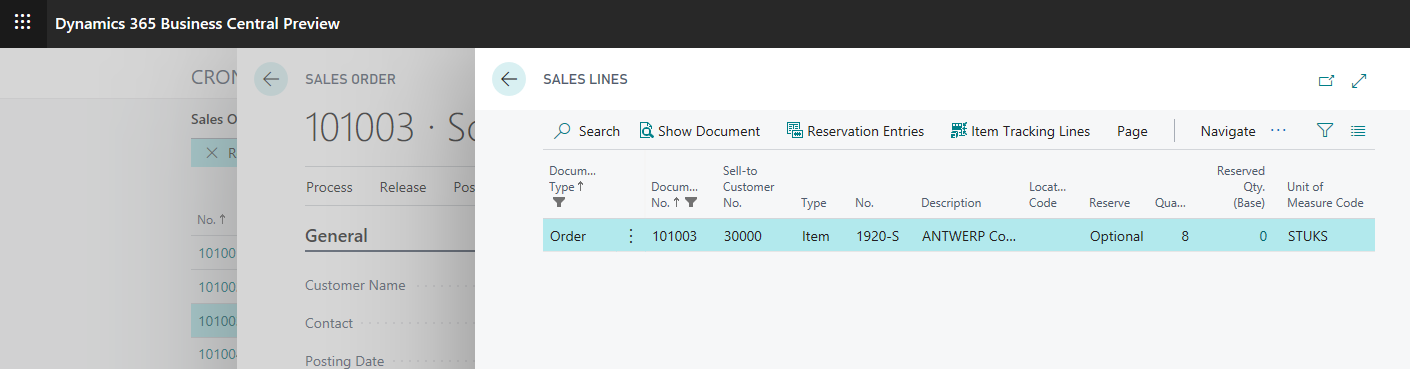
The “Manual Price” is added to the “Sales Header” and “Purchase header” as well. When one or more of the “Sales Lines” or “Purchase Lines” contains a manual price, the value of this field in the header of the “Sales Order” or “Purchase Order” will change to Yes, see picture above. You can select the value Yes to display a list of all the lines in the Sales Order or Purchase Order, which contain a manual price:
The field “Manual Price” is also added to the header and lines of all other tables and pages associated to the sales and Purchase process, i.e., “Sales Quotes”, “Sales Order Archive”, “Posted Sales Shipments”, “Posted Sales Invoices”, “Purchase Quotes”, “Purchase Order Archive”, “Posted Purchase Receipts” and “Posted Purchase Invoices” as well as in the return order process tables and pages.
You can use this functionality to control margins and sales performances and keep track of how often prices and discount % are changed manually. You can also use this functionality for example in a workflow as a criterion for approval.
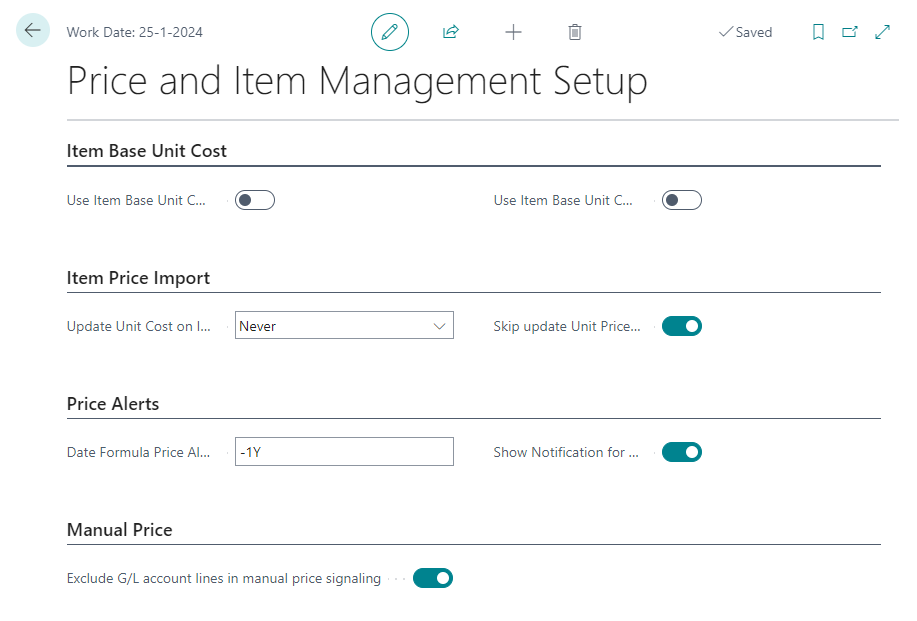
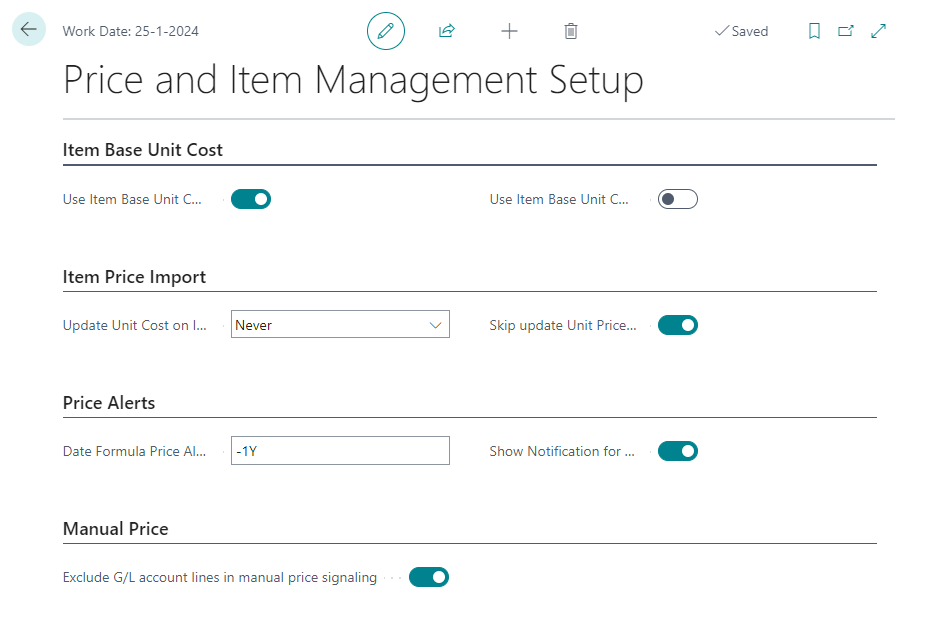
You can turn off (or on) the manual price signaling for G/L account lines in the Price and Item Management Setup with the option Exclude G/L account lines in manual price calculation.
Price Signaling
Many wholesale companies regularly receive price and discount lists from their suppliers, on which their own pricing is based. Since these lists often contain large amounts of items and prices, these tables are quite complex to manage and you want to make certain that the “Sales prices” and “Sales discount lines” contain actual information when a “Sales Order” or “Sales Quote” is made.
If a “Sales Line” is entered that contains a price, based on an “old” “Sales Price” or “Sales Line Discount %”, the value of the “Unit Price Excl. VAT” will be displayed in red. To use this signaling, navigate to “Price and Item Management Setup” to set a “Date Formula Price Alert”.
This “Date Formula” will calculate whether signaling should be applied. The calculation is based on the “Starting Date” of the “Sales Price” or “Sales Discount Line” for the particular Item (Group) and Customer (Group).
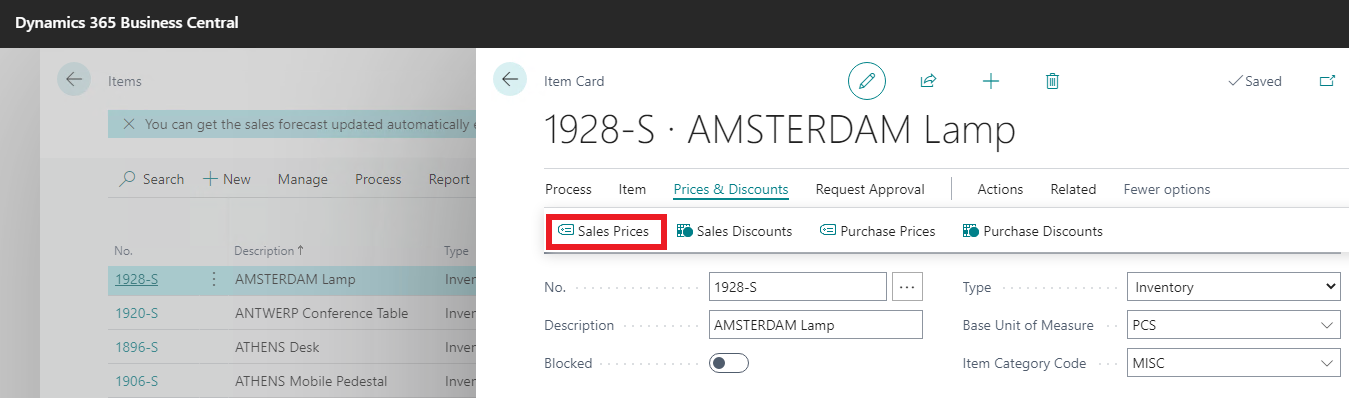
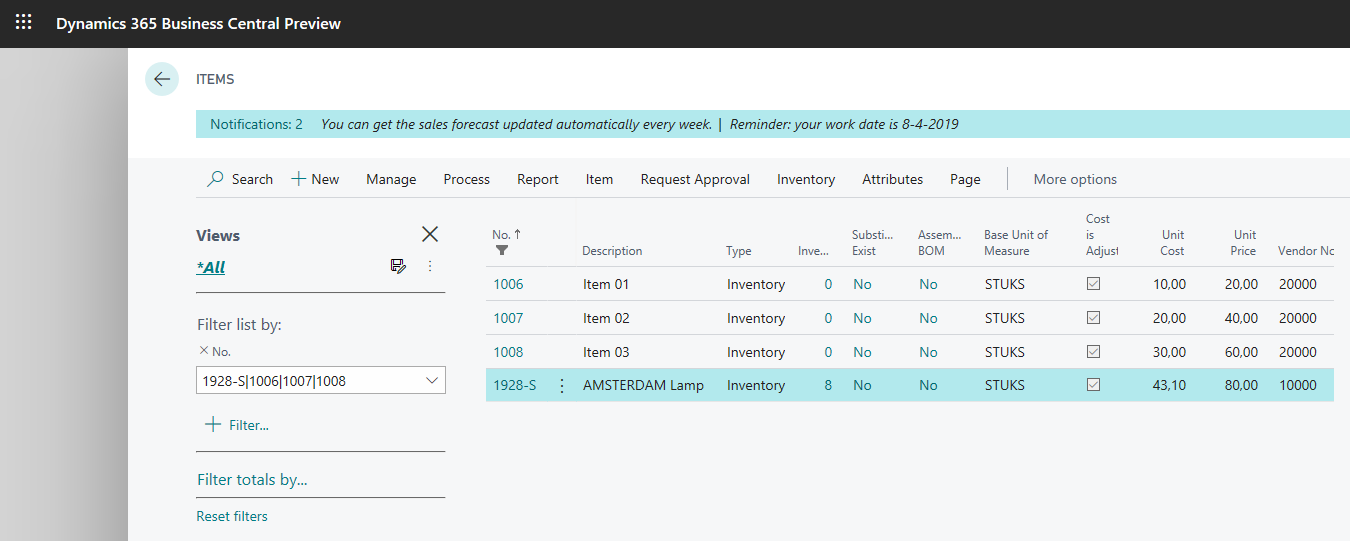
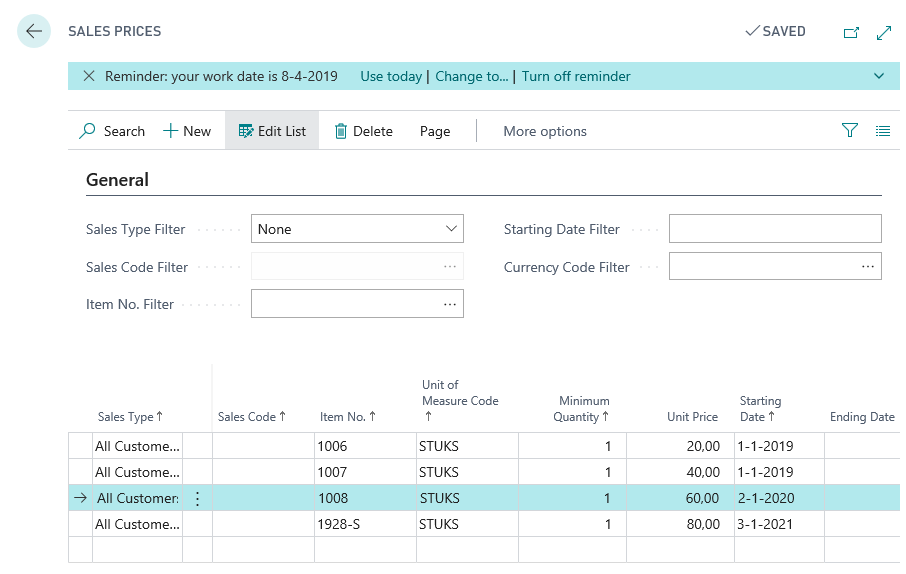
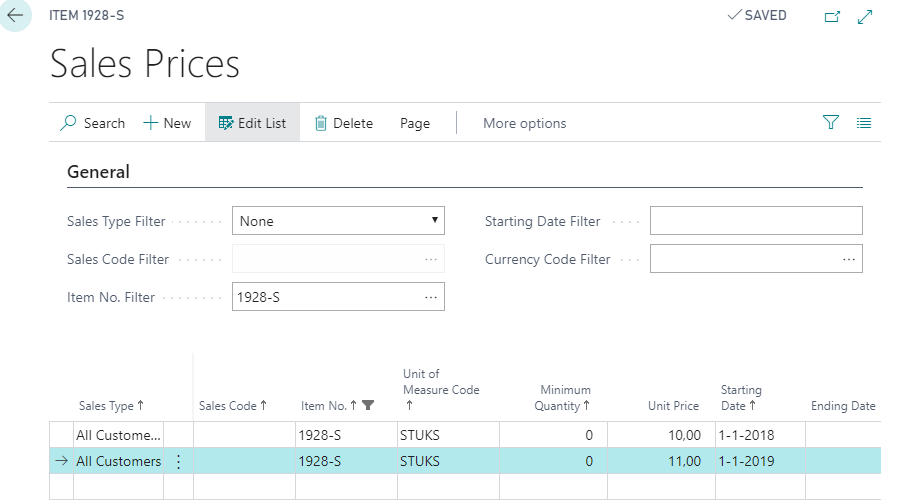
Consider the scenario below by Navigating to “Items” and selecting an Item, i.e., “1928-S” in example below and select “Prices & Discounts” and subsequently “Sales Prices”:
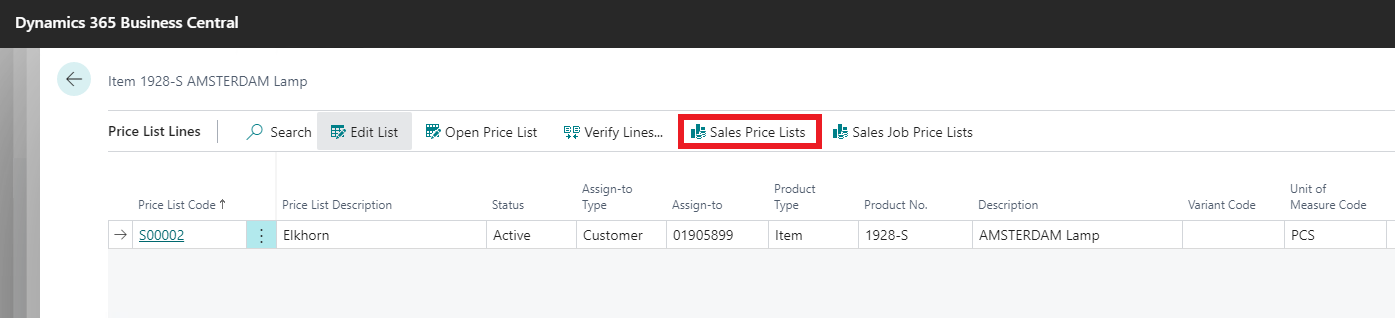
To create a new “Sales Price” for a Customer select “Sales Price Lists”
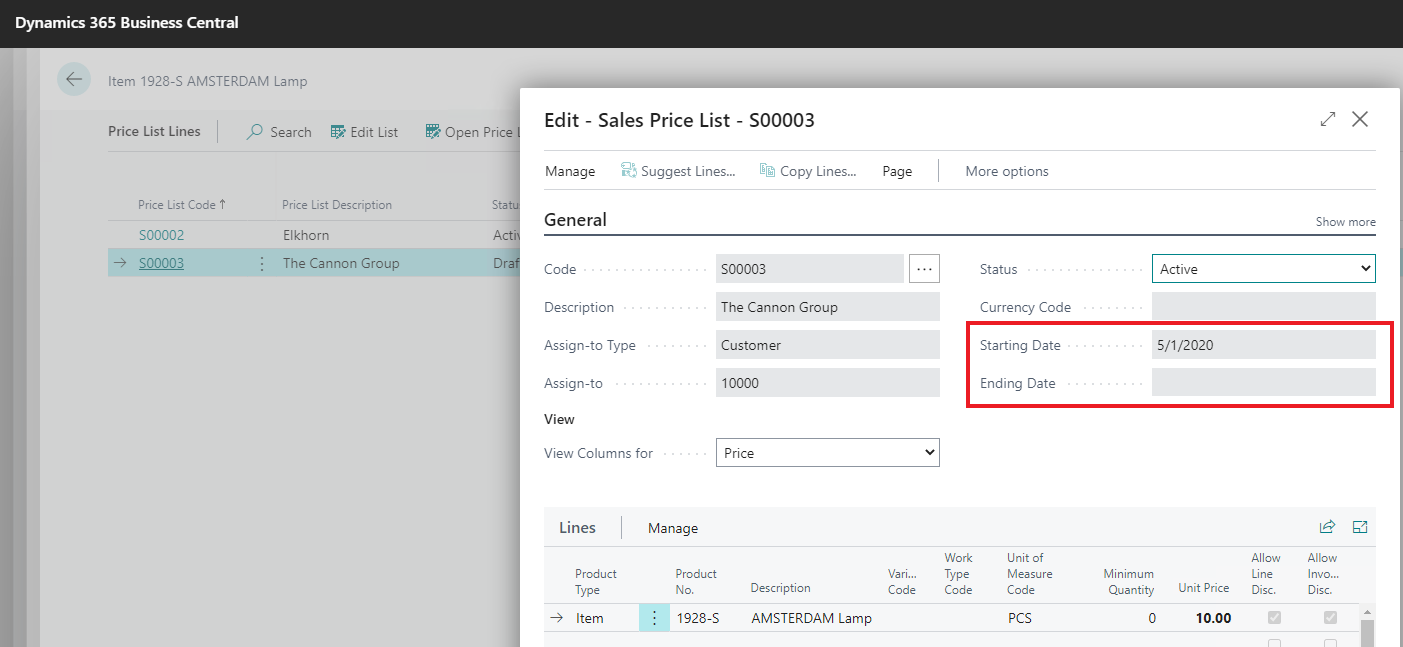
Create a “Sales Price List” for a Customer with a Starting Date in the past that is longer ago than the “Date Formula Price Alert” based on the “Working Date”
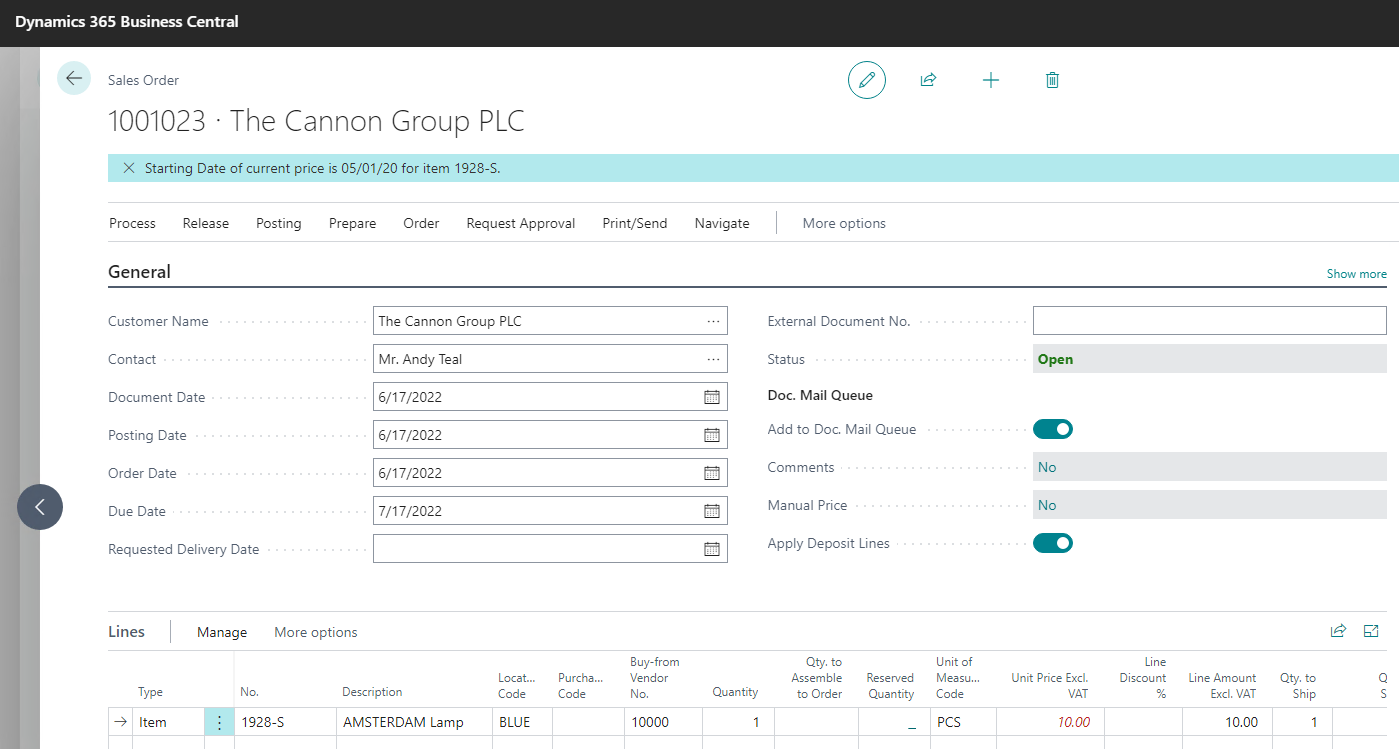
Create a “Sales Order” for this customer and a “Sales Line” with this “Item No.” and for example an “Order date” of 6/17/2022, see picture below. The price in the field “Unit Price Excl. VAT” will be shown in red color as a signal that the “Sales Price” or “Sales Discount %” is overdue:
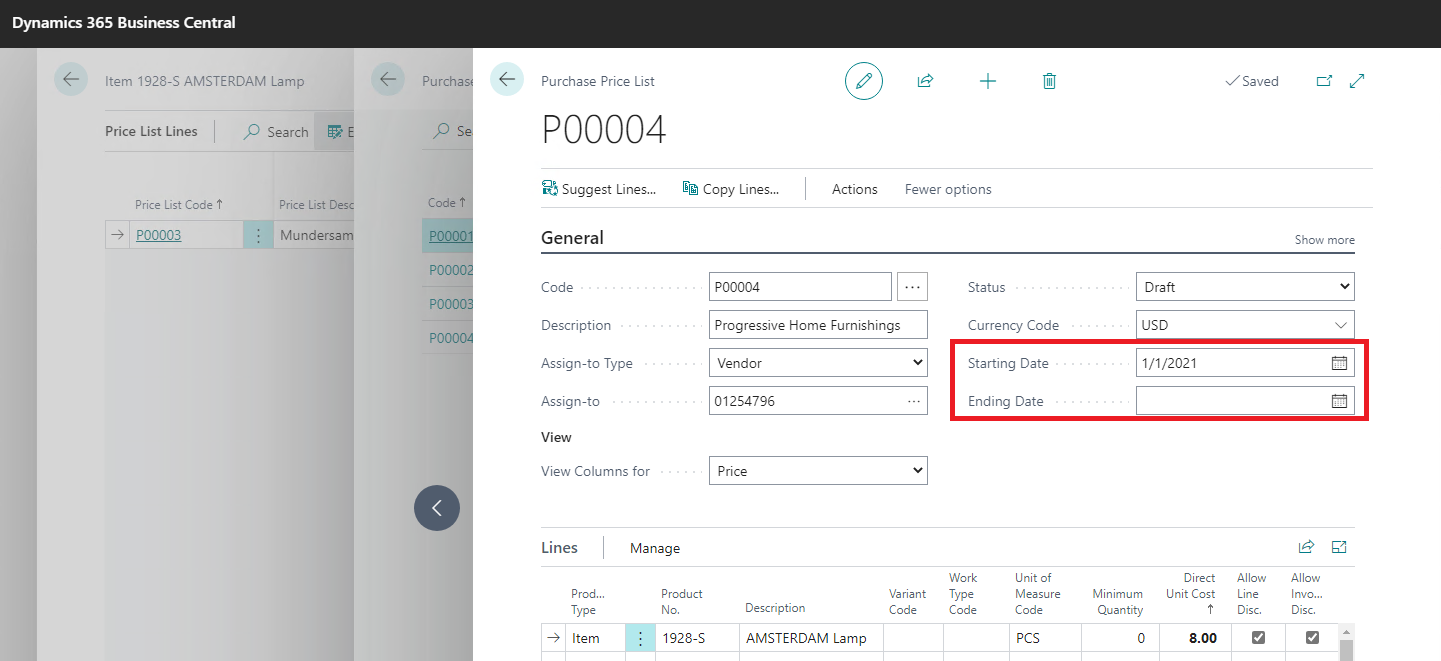
“Price signaling functionality” is also available for purchase prices and purchase discounts. It works similar as Sales Prices. In the example below, for Item “1928-S”, we have selected “Prices & Discounts” and subsequently “Purchase Prices”. We have created a new Purchase Price list for a specific Vendor with a Starting Date in the past that is longer ago than the “Date Formula Price Alert” based on the “Working Date”.
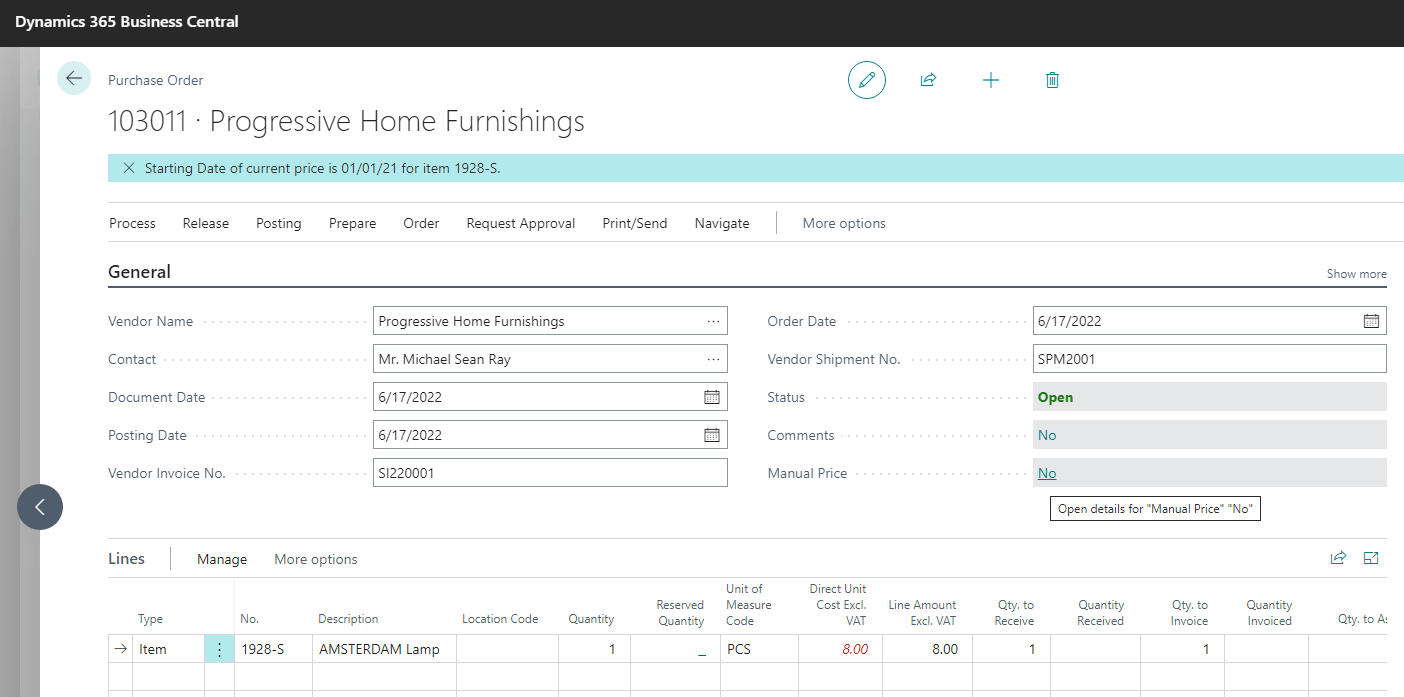
When create a “Purchase Order” for this vendor and a “Purchase Line” with this “Item No.” and for example an “Order date” of 6/17/2021, see picture below. The price in the field “Direct Unit Cost Excl. VAT” will be shown in red color as a signal that the “Purchase Price” or “Purchase Discount %” is overdue:
Exclude items from manual check
In some cases, it is convenient to turn off manual price check per item, for example shipping costs, when the prices are always different. Based on the settings below, you can set this up per item and exclude the item from price check.
To include or exclude items from price alert, you can adjust the following settings:
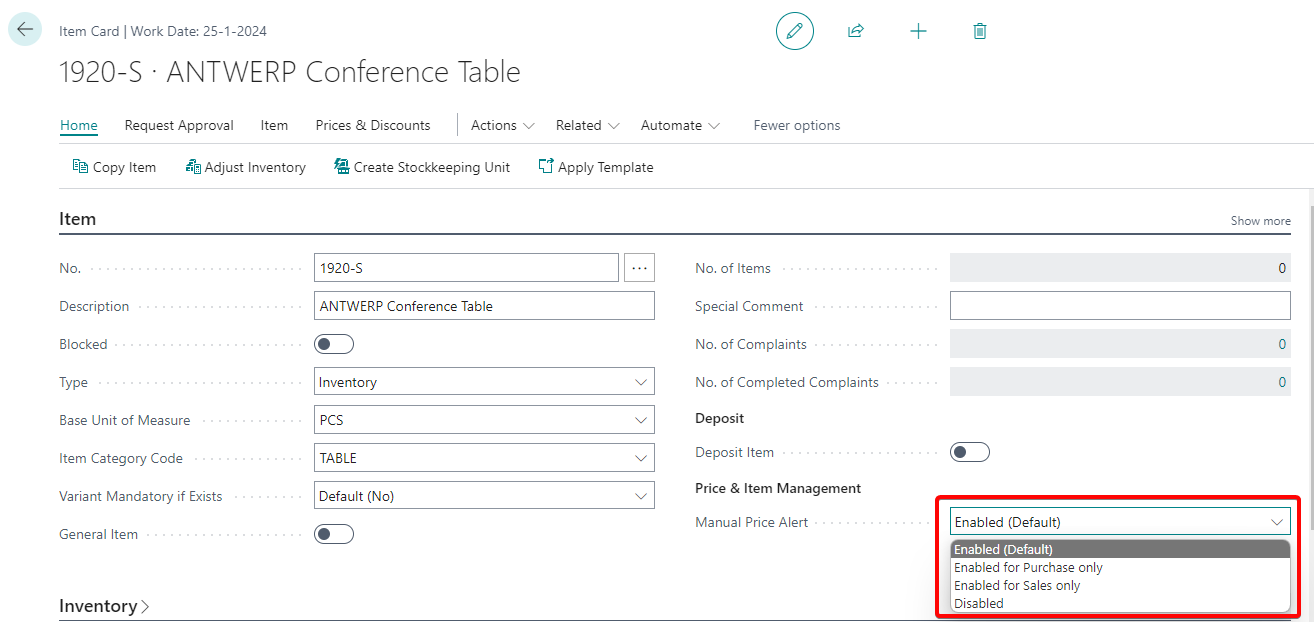
Item Card > FastTab: Item > Price & Item Management
Manual Price Alert: * Enabled (default) * Enabled for Purchase only * Enabled for Sales only * Disabled
Item Price Import/Export
Import of the Item Prices
As indicated before, managing and maintaining the large Sales and Purchase Price tables can be quite cumbersome. It is quite common that suppliers provide new price lists once or more times each year and that you as a wholesale trader need to update your sales prices as well at the same rate. Furthermore, these lists may contain items that are not present in Microsoft Dynamics 365 Business Central yet. Although the Configuration Packages provides the opportunity to import such data, this functionality is not very flexible.
Price & Item Management comes with a flexible import functionality that can not only import purchase and sales prices at the same time, but also create items if the item is new. It is also not required to have your own “Item No.” in the import document, as the import function will also recognize the item based on the “Vendor Item No.” and “Vendor No.”
Furthermore, this function circumvents several issues you may encounter with differences in the formatting of the dates and numbers between the import files and Microsoft Dynamics 365 Business Central, because this function is based on a csv-format (comma separated).
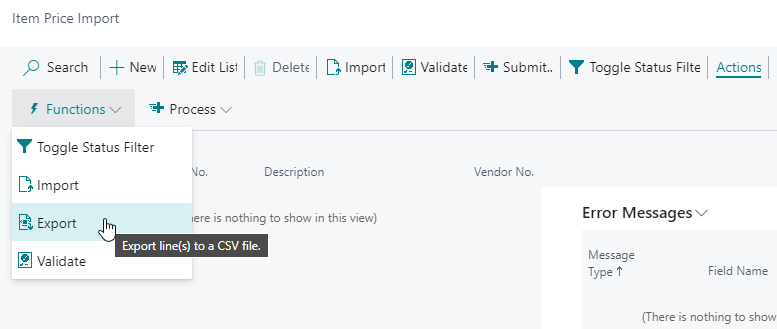
To use this functionality, navigate to “Item Price Import”. It is advised to start with an export, even though the table may be empty, to create a csv-export file in which it is clear what the order of the columns in the import file should be. To do this select Actions > Functions > Export.
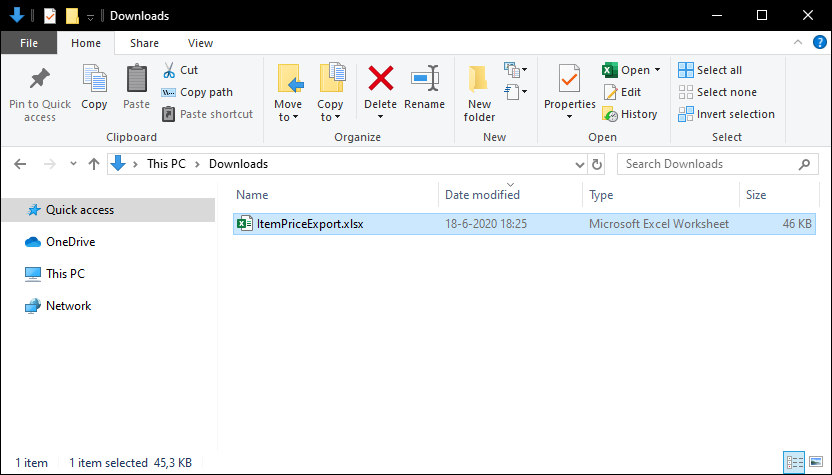
A file under the Name “ItemPricesExport.csv” is saved in your local Downloads folder. When you open this document in Excel you will find the following columns which are used for the import:

With this mapping you can convert your data to this lay-out. Once you have done this, you need to save the file as a csv-file. You do not need to delete the first row containing the column headers as the import will automatically discard these.
Note: records available in the page (filtered) are included in the export.
Consider the following scenario in which there are 4 records in an import file:

In the first 3 records there is no “Item No.”, but “Vendor No.” and “Vendor Item No.” are given. Furthermore, for all rows there is a “Direct Unit Cost” and “Unit Price” and a “Starting Date”. Furthermore, there is also the possibility to import / adjust the “Tariff No.”, “Country/Region of Origin Code” and/or “New weight” of the items.
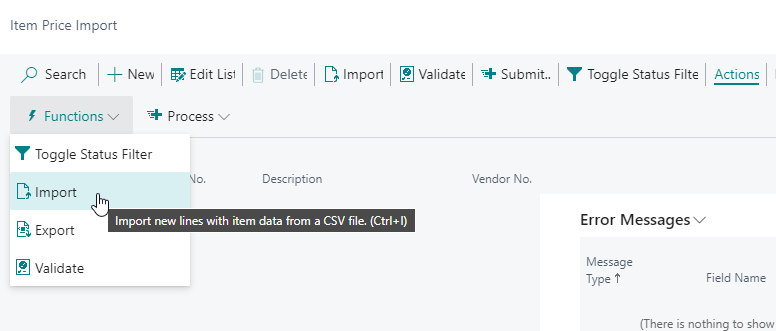
To import a file, select Actions > Import from the “Item Price Import” page.
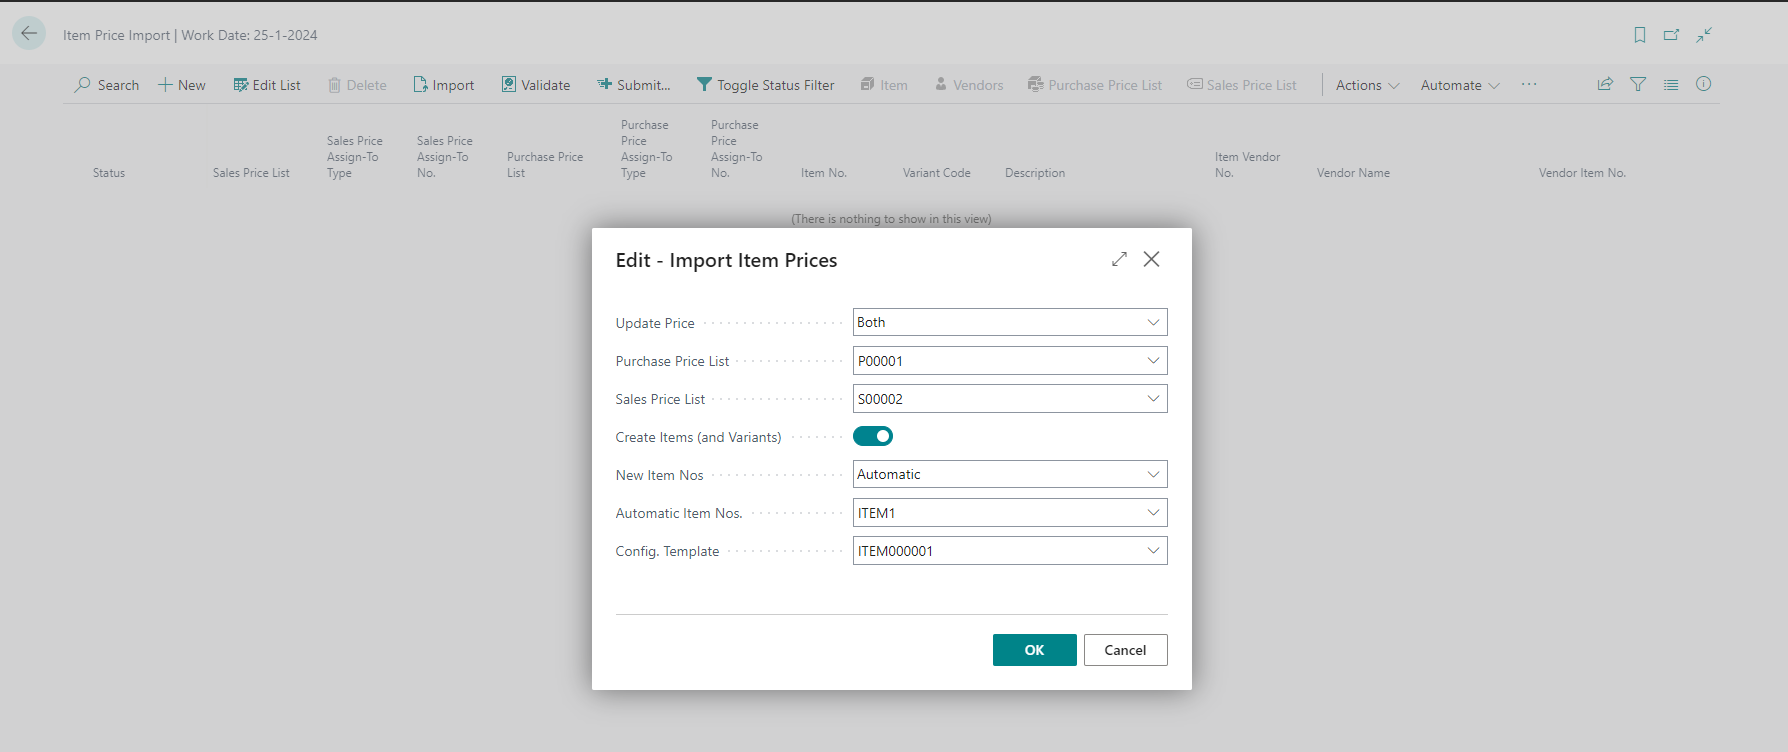
A pop-up appears where there are several options to choose:
In “Update Price” you can select “Unit Cost”, “Unit Price” or “Both”.
-
If you select “Unit Cost” the “Unit Cost” on a record in the “Purchase Price” table is updated or inserted. If the “Update Unit Cost on Item Card” setting is set to “If viable”, then the “Unit Cost” on the Item card will be updated as well. The “Unit Cost” on the Item card can only be modified if the Microsoft Dynamics 365 Business Central logic allows that. For example, the “Unit Cost” of items with “Item ledger entries” present cannot be modified.
-
If you select “Unit Price” both the “Unit Price” on the Item card as well as a record in the “Sales Price” table is updated or inserted. This “Sales Price” record will be a record for all Customers.
- If you select “Both”, obviously both options above will be executed.
If “Create Items (and Variants)” is selected, new items and if available the variants will be created for records in the import file for which no items can be found in the database. In that case both the “Item No.” in the import must have been empty or not existing as well as the combination “Vendor No.” and “Vendor Item No.” could not be traced to an existing item.
If “Create Items (and Variants)” is selected, you can choose out of 3 options how the new item should be numbered in the field “New Item Nos”.
- In case “Item No.” is selected, the value in the column “Item No.” in the import file is used as the new “Item No.” In case “Vendor Item No.” is selected, the value in the column “Vendor Item No.” in the import file is used as the new “Item No.”
- In case Automatic is selected, a new “Item No.” is generated based on the number series properties you can select in the next field “Automatic Item Nos.”
In the last field “Config. Template” you can select the configuration template that will be used for the creation of new items. This template will be used for all new items in the same import file.
After filling out this pop-up, you can select OK, after which the following pop-up appears:
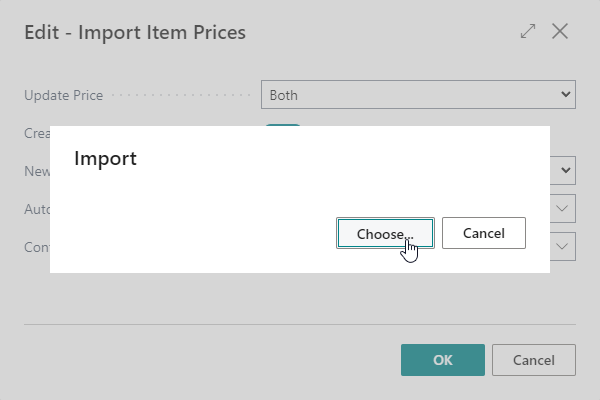
By selecting Choose, Explorer will be opened where you can select the file that you wish to import:
By selecting “Open” the import will start and after this has been done a message will appear, indicating how many lines have been imported:

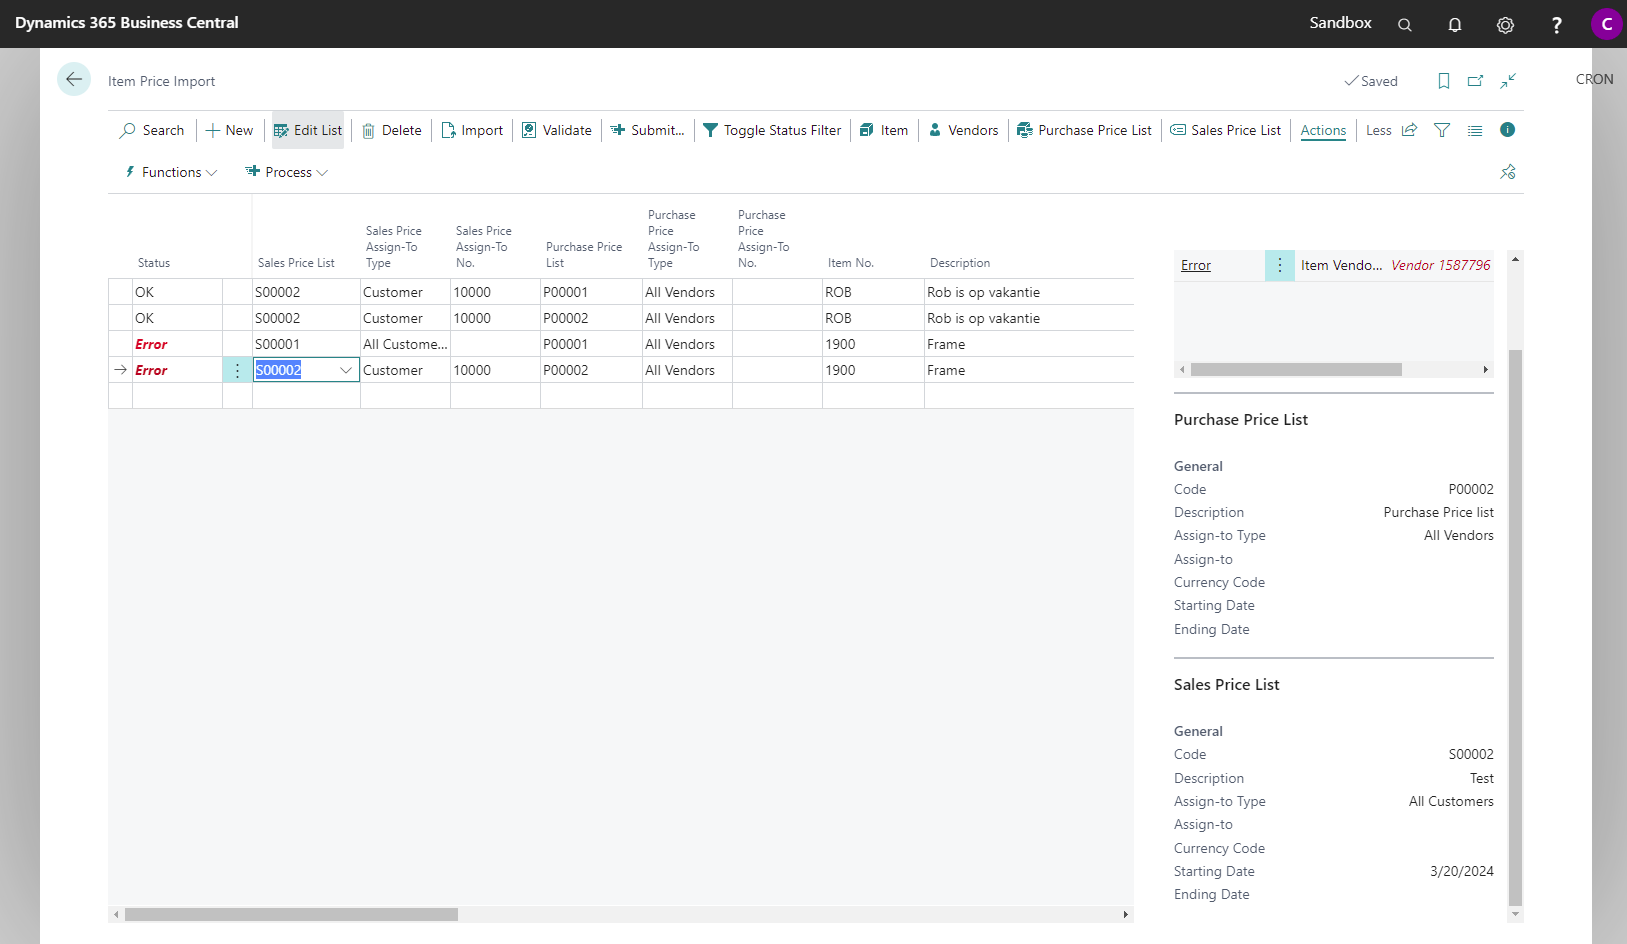
The import of the example file shown above will result in the situation, presented below. For lines 1 and 2 the “Item No.” was found based on the “Vendor No.” and “Vendor Item No.” present on the item card. Line 4 contained an item present in the database. Line 3 apparently contains a new item. In this page you can still make changes before these lines are submitted. You can select Process > Validate to check whether the data are valid. If not, an error message will appear in the Fact box for the invalid lines. You can resolve the error messages or delete the line to proceed. If these errors are not resolved these lines will be skipped.

After the data have been checked, adjusted where necessary and revalidated you can select Process > Submit to submit the lines.
The following screenshot displays the item list, filtered for the items in the scenario, after submitting. You can see that the “Unit Cost” and “Unit Price” have been adjusted for these items except for the “Unit Cost” of item “1928-S”, where it was not allowed.
If you navigate to the Sales Prices from a random item and adjust the filter settings to the items in the scenario, you will also see that records are generated for these items as well:
Import of the Item Variant Codes
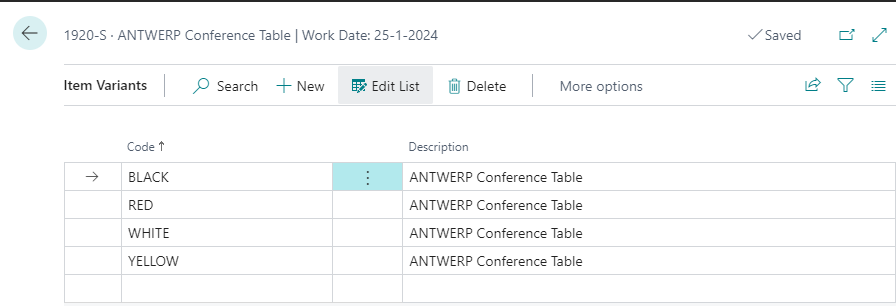
While importing the Price Lists, it is also possible to import Product Variants. To do this, enter the "Variant Code" in the import file.

If the "Create Items (and Variants) field is checked in the "Import Item Prices" screen, the Item Variants will be created automatically. After importing the Product Variants, the result is as follows for product 1920-S:
Process discounts with the Item & Price Import for Sales & Purchase
It is now also possible to specify a discount% per line when importing a price list. To do this, use the "Sales Line Discount %" and "Purchase Line Discount %" fields in the import file.

Skip update of Unit Price on Import
In some cases, you don't want to update Unit Price on the Item Card. In this case, you can turn off updating Unit Price under the Price and Item Management Setup.

Use factor for calculating Unit Price based on Unit Cost
If you want to automatically calculate the Unit Price based on the Unit Cost, you can use a factor for the calculation. The Unit Price will be calculated by Unit Cost x Factor
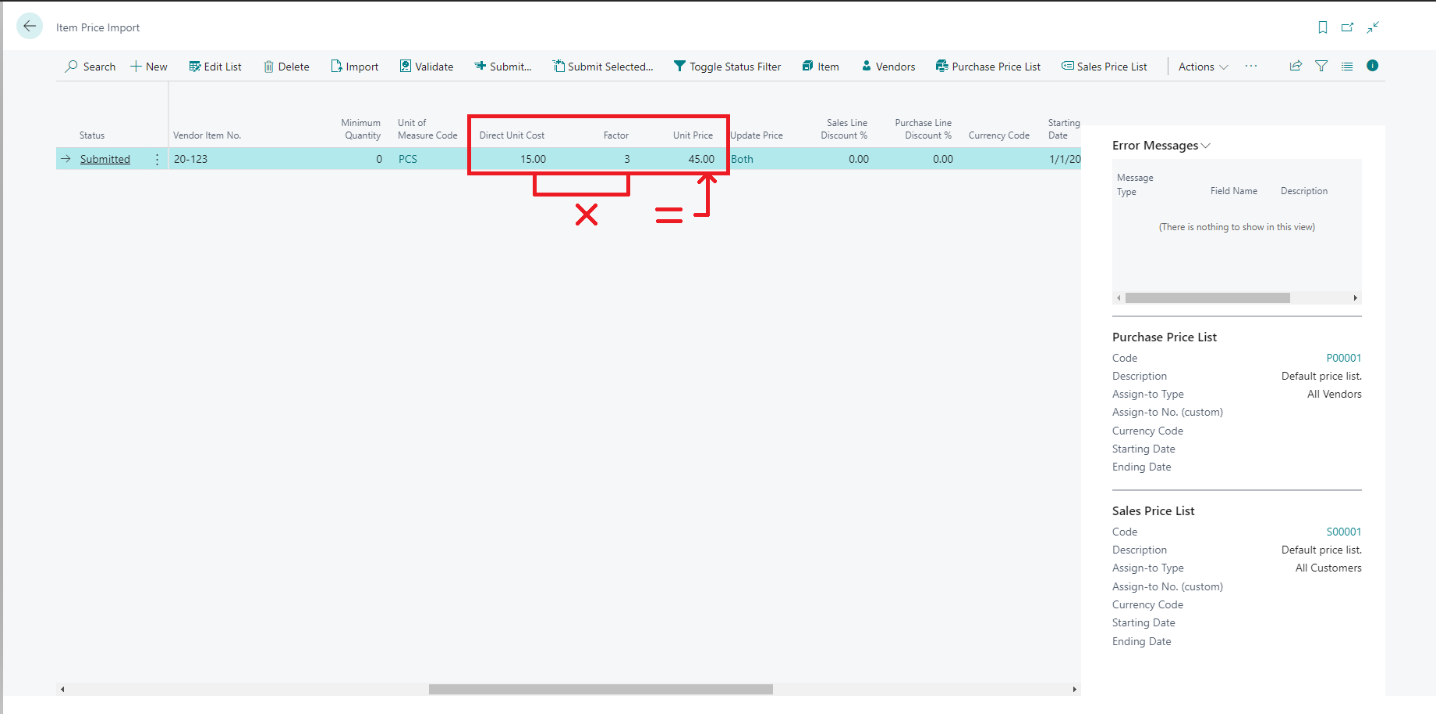
Prerequisites for the calculation:
- Factor <> 0
- Unit Cost <> 0
- Update Price = Both
You can calculate the Unit Price directly on import of the pricelist or afterwards it will always be calculated on validation or submitting the entries.
This can be set up by the Calculate Unit Price directly with Factor option on the request form if the Import Item Prices.
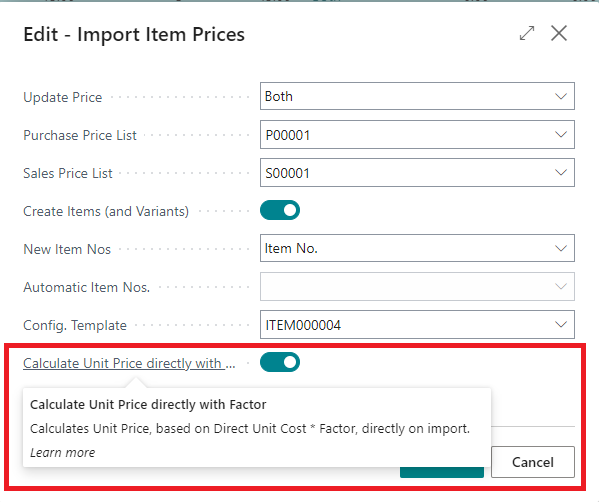
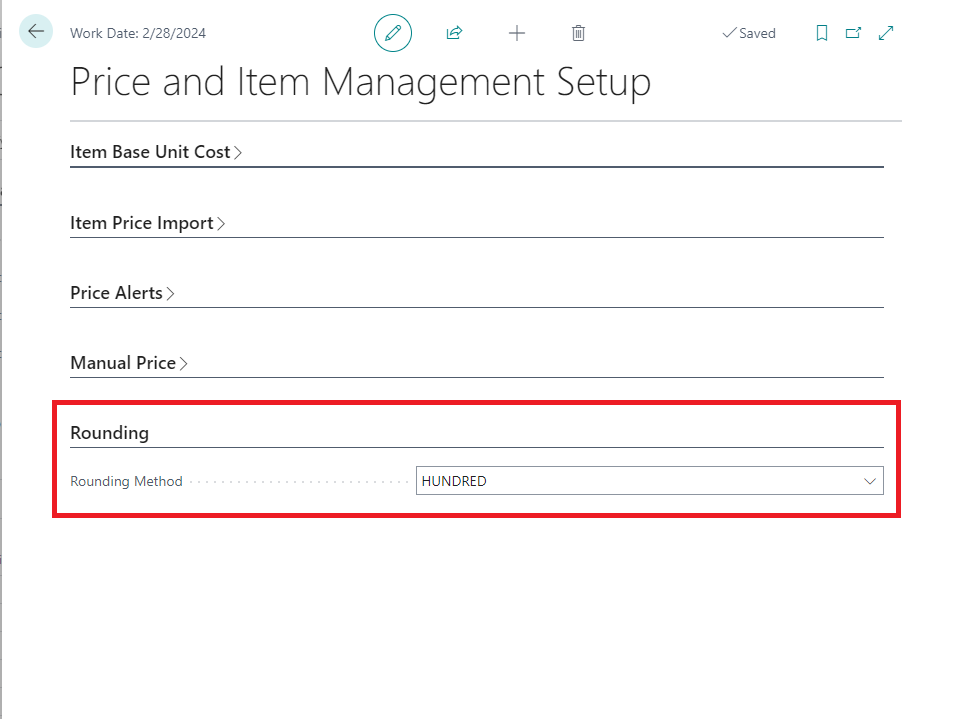
If you want to use a Rounding Method during the calculation you can set up a Rounding Method in the Price and Item Management Setup.
Item Price Import Free Fields
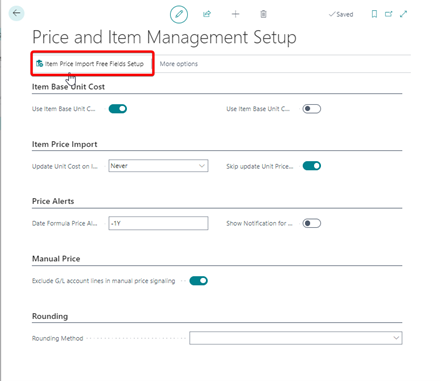
With the Item Price Import Free Fields, you can set up your own fields to be imported, validated & submitted with the Item Price Import. You can open the Item Price Import Free Fields Setup from the Price and Item Management Setup page.
In the Item Price Import Free Fields Setup you can configure five free fields. For each free field you will need to configure:
- Free Field Table No.: Choose from the following available tables
- Item
- Price List
- Price List Line
- Free Field Field No.: The field which you want to import
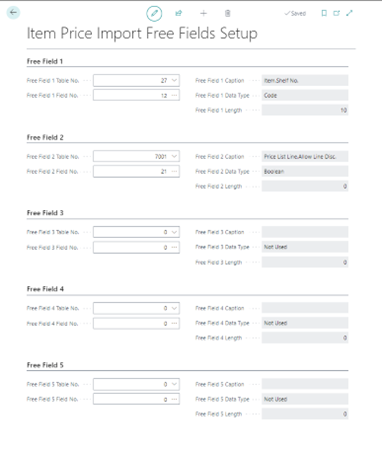
The Caption, Data Type and Length of the field are shown after you’ve setup the Field No. The Data Type _and _Length of the field will be validated on the Validate and Submit step of the import. Note: please restart the browser / Business Central session to enable the captions of the Free Fields in the Item Price Import page. In the Item Price Import page, the configured free fields are visible with their corresponding caption. Fields not setup are shown with the caption “Not Used”. The free fields are included in the export template file and are processed with the Import, Validate and Submit actions.
Close Old Price Records
When new prices are imported, chances are that there are old prices records, that have a starting date prior to the new records and an open end date:
In case the prices in the new agreements are higher, the system will still select the old price in the sales or purchase document. To prevent this, the old records should receive an end date. For this, two batches are included in the Item Price Import screen:
- Close Previous Purchase Prices
- Close Previous Sales Prices
These batches can be selected from the Actions > Process menu:

When the batch is executed, the system will Search for records that have a blank ending date. If a record is found, it then searches for records with:
- the same minimum quantity
- the same item number
- the same Sales Type & Code
- the same Unit of Measure code
- new Starting Date
In case a record is found in the Price List, the record with the older starting date will be updated with an ending date that is one day before the starting date of the newer record:

New Sales Pricing Experience
Microsoft Dynamics 365 Business Central has a new feature: New sales pricing experience. This feature uses Price Lists for the setup of Purchase and Sales Prices.
For more information see the link below: Use new sales pricing experience - Dynamics 365 Release Plan | Microsoft Docs
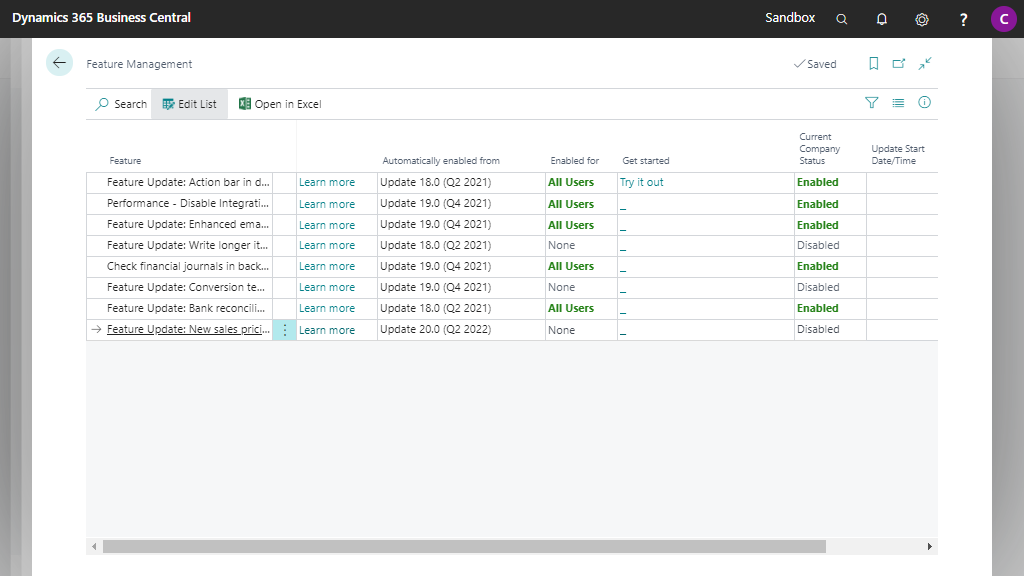
This feature is automatically enabled from update 20.0 (Q2 2022). If you want to use this feature ahead of time you can enable this feature in the Feature Management Page.
Note:
After you enable this feature for all users, you cannot turn it off again. Please first experience this feature in a sandbox environment.
When this feature is enabled it automatically affects the Item Price Import functionality of the Price & Item Management app.
The important changes are listed below.
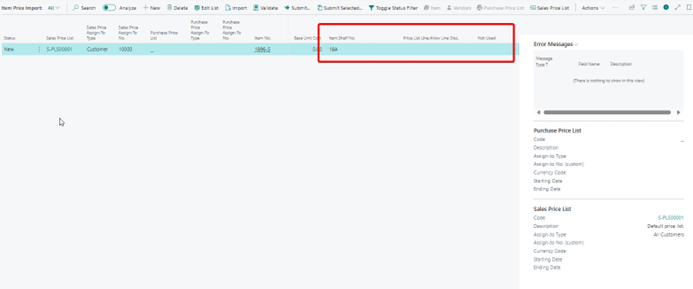
- Purchase Price List and Sales Price List fields are included in the pop-up of the Import Item Prices. For the Purchase Price List the price list must apply for a vendor and the Sales Price must apply for All customers.
-
The fields Purchase Price List and Sales Price List are included in the import / export file and the Item Price Import page.
-
The fields Purchase Price Assign-To Type, Purchase Price Assign-To No., Sales Price Assign-To Type and Sales Price Assign-To No. are included in the import / export file and the Item Price Import page.
-
The Purchase Price List and Sales Price List are mandatory fields during the validate & submit of the import
-
Factboxes Purchase Price List and Sales Price List are added to the Item Price Import page. These Factboxes provide more details of the purchase and sales price list of the selected line.
-
After the submit of the import the price lines are added to the price list specified in the import lines.
-
Close Previous Purchase Prices & Close Previous Sales Prices merged into one function: Close Previous Prices
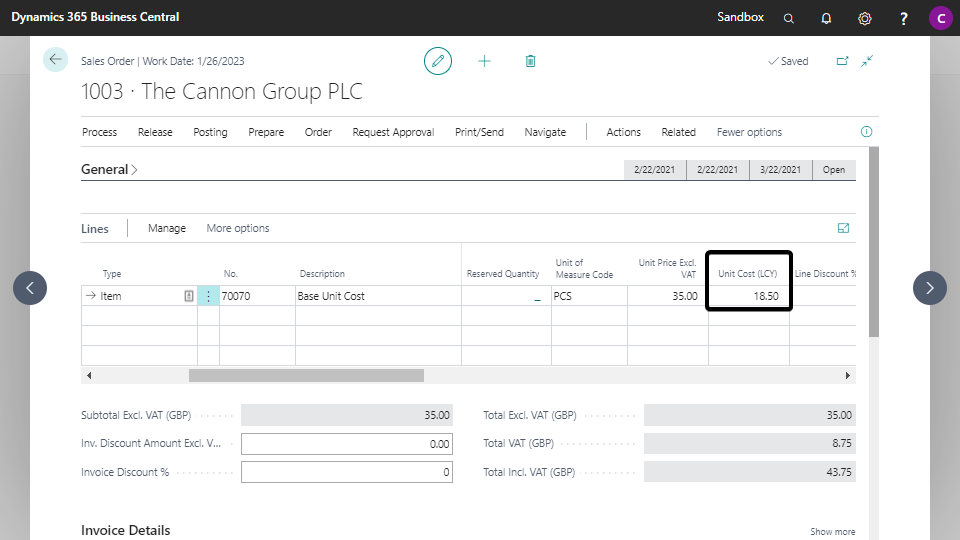
Base Unit Cost (Sales & Service)
The Base Unit Cost for Sales & Service is used when you are using the item cost calculation method of FIFO, but you still want a fixed cost for the margin calculation in the sales & service documents.
It works like the Standard Cost for the Costing Method Standard, but with the flexible final costing of FIFO. Ideal for your trade goods.
How to use
-
Open the Price and Item Management Setup page.
-
Enable the Base Item Unit Cost (Sales) setting for the use of the Base Item Unit Cost for sales documents, and enable the Base Item Unit Cost (Service) setting for the use in service documents.

- If one of the two fields are checked on, the fields Base Unit Cost and Date Base Unit Cost will be visible on the Item Card. In the Base Unit Cost field on the Item Card, you can enter the preferred Unit Cost. On update of the field Base Unit Cost the Date Base Unit Cost will automatically be changed to the workdate.
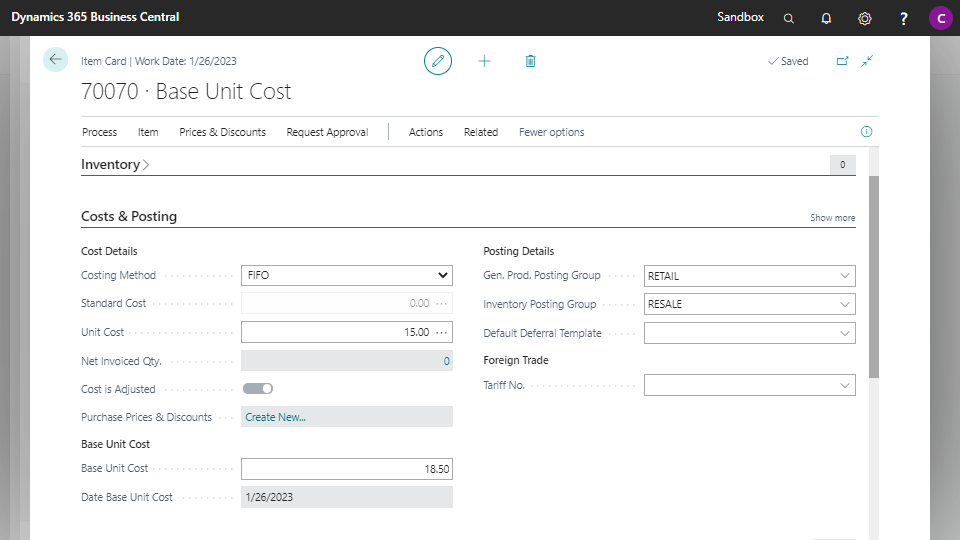
- If you enter the Item in a Sales Order Line the Base Unit Cost of the item is transferred to the Unit Cost (LCY) in the Sales Order Line and will be used for the margin calculation and other statics. When you post the Item the cost posting will take the FIFO unit cost calculation into account.